[핸즈온 머신러닝] 14장(3) -케라스를 통한 CNN 구현 및 모델 사용
14. 5 케라스를 사용해 ResNet-34 CNN 구현하기

- ResNet-34는 34개 층으로 이루어진 ResNet으로
- 64개 특성 맵을 출력하는 3개 RU, 128개 맵의 4개 RU, 512개 맵의 3개 RU를 포함
ResidualUnit, 잔차유닛 층 생성
class ResidualUnit(keras.layers.Layer):
def __init__(self, filters, strides=1, activation="relu", **kwargs):
super().__init__(**kwargs)
self.activation = keras.activations.get(activation)
self.main_layers = [
keras.layers.Conv2D(filters, 3, strides=strides,
padding="same", use_bias=False),
keras.layers.BatchNormalization(),
self.activation,
keras.layers.Conv2D(filters, 3, strides=1,
padding="same", use_bias=False),
keras.layers.BatchNormalization()]
self.skip_layers = []
if strides > 1:
self.skip_layers = [
keras.layers.Conv2D(filters, 1, strides=strides,
padding="same", use_bias=False),
keras.layers.BatchNormalization()]
def call(self, inputs):
Z = inputs
for layer in self.main_layers:
Z = layer(Z)
skip_Z = inputs
for layer in self.skip_layers:
skip_Z = layer(skip_Z)
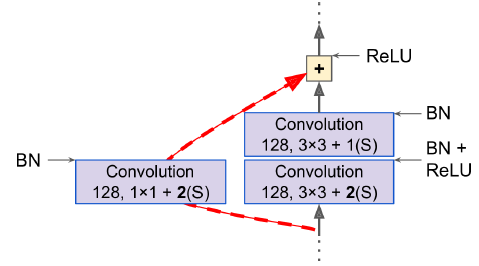
return self.activation(Z + skip_Z)- main_layers : 아래 그림의 오른쪽 모듈
- skip_layers : 왼쪽 모듈 (stride가 1보다 큰 경우에 필요 -> 입력 x와 출력의 크기가 다른 경우)
- call() : 입력을 main_layers와 skip_layers에 통과시킨 후 두 출력을 더하여 활성화 함수 적용
Sequential class를 사용해 ResNet-34 모델 생성
model = keras.models.Sequential()
model.add(keras.layers.Conv2D(64, 7, strides=2, input_shape=[224, 224, 3],
							  padding="same", use_bias=False))
model.add(keras.layers.BatchNormalization())
model.add(keras.layers.Activation("relu"))
model.add(keras.layers.MaxPool2D(pool_size=3, strides=2, padding="SAME"))
prev_filters = 64
for filters in [64] * 3 + [128] * 4 + [256] * 6 + [512] * 3:
    strides = 1 if filters == prev_filters else 2
    model.add(ResidualUnit(filters, strides=strides))
    prev_filters = filters
model.add(keras.layers.GlobalAvgPool2D())
model.add(keras.layers.Flatten())
model.add(keras.layers.Dense(10, activation="softmax"))
- ResidualUnit층 반복
- 처음 3개 RU는 64개 필터를 가짐
- 그 다음 4개 RU는 128개 필터를 가짐
- 그 다음 6개 RU는 256, 그 다음 3개 RU는 512개 필터를 가지는 식
- 필터 개수가 이전 RU와 동일할 경우 strides를 1로 설정
- 아닐경우 strides를 2로 설정
- 각 RU을 더해주며 prev_filters 업데이트
14. 6 케라스에서 제공하는 사전훈련된 모델 사용하기
GoogLeNet이나 ResNet 같은 표준 모델은 keras에서 불러올 수 있음
이미지넷 데이터셋에서 사전훈련된 ResNet-50 모델 로드
이미지는 이전 절에서 사용했던 샘플 이미지 로드
import numpy as np
from sklearn.datasets import load_sample_image

# Load sample images
china = load_sample_image("china.jpg") / 255
flower = load_sample_image("flower.jpg") / 255
images = np.array([china, flower])
사전 훈련된 ResNet-50 모델 로드 및 이미지 resize
import tensorflow as tf

def plot_color_image(image):
    plt.imshow(image, interpolation="nearest")
    plt.axis("off")

# ResNet-50 모델 생성 및 사전 훈련된 가중치 다운로드
model = keras.applications.resnet50.ResNet50(weights="imagenet")

# ResNet-50이 기대하는 픽셀 크기로 이미지 크기 변경 : 224x224
images_resized = tf.image.resize(images, [224, 224])

plot_color_image(images_resized[0])
plt.show()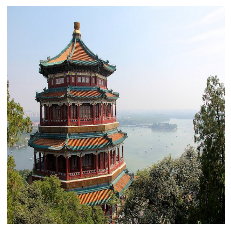
전처리 과정 추가
사전 훈련된 모델은 이미지가 전처리되었다고 가정
- 경우에 따라 0~1 또는 -1~1 사이의 입력을 기대함
- 모델마다 전처리 함수인 preprocess_input()이 제공됨 (=사전 훈련된 모델이 기대하는 입력으로 전처리)
- 해당 함수는 픽셀값이 0~255 사이라고 가정하므로,
- images_resized에 255를 곱해야함 (앞에서 images가 0~1사이로 바뀌었기 때문)
inputs = keras.applications.resnet50.preprocess_input(images_resized * 255)
예측 수행
Y_proba = model.predict(inputs)

Y_proba.shape
=> (2, 1000)
- Y_proba는 행이 하나의 이미지, 열이 하나의 클래스인 행렬
- 1000개의 클래스
최상위 K개의 예측을 클래스 이름과 예측 클래스의 추정 확률 출력
- decode_predictions() : 각 이미지에 대해 최상위 K개의 예측을 담은 리스트 반환
top_K = keras.applications.resnet50.decode_predictions(Y_proba, top=3)
for image_index in range(len(images)):
    print("Image #{}".format(image_index))
    for class_id, name, y_proba in top_K[image_index]:
        print("  {} - {:12s} {:.2f}%".format(class_id, name, y_proba * 100))
    print()
=>
Image #0
n03877845 - palace 42.87%
n02825657 - bell_cote 40.57%
n03781244 - monastery 14.56%
Image #1
n04522168 - vase 46.83%
n07930864 - cup 7.78%
n11939491 - daisy 4.87%
- 두 이미지의 정답 클래스(monastery, dasiy)가 상위 결과 3개 안에 포함되어 있음
- 모델이 1000개의 클래스 중에 추정한 것
이미지 넷에 없는 이미지 클래스를 감지하는 이미지 분류기가 필요하다면, 사전훈련된 모델을 사용해 전이 학습을 수행할 수 있음
14. 7 사전훈련된 모델을 사용한 전이 학습
충분하지 않은 훈련 데이터로 이미지 분류기를 훈련하려면, 사전훈련된 모델의 하위층을 사용할 수 있음
사전훈련된 Xception 모델을 사용한 꽃 이미지 분류하는 모델 훈련
데이터 로드 및 info 확인
with_info 지정시 데이터 info 확인 가능
import tensorflow_datasets as tfds

dataset, info = tfds.load("tf_flowers", as_supervised=True, with_info=True)
dataset_size = info.splits["train"].num_examples  # 3670
class_names = info.features["label"].names  # ['dandelion', 'daisy', ...]
n_classes = info.features["label"].num_classes  # 5
해당 데이터셋은 train 세트만 있기 때문에, 훈련 세트를 나눔
- 처음 10%를 테스트 세트로, 15%를 검증 세트, 나머지 75% 훈련 세트로 나눔
test_set_raw, valid_set_raw, train_set_raw = tfds.load(
    "tf_flowers",
    split=["train[:10%]", "train[10%:25%]", "train[25%:]"],
    as_supervised=True)
이미지 전처리
- 이 CNN 모델은 224x224 크기 이미지를 기대하므로 전처리 수행
- xception 패키지에 포함된 preprocess_input() 함수 사용
def preprocess(image, label):
    resized_image = tf.image.resize(image, [224, 224])
    final_image = keras.applications.xception.preprocess_input(resized_image)
    return final_image, label
훈련 세트 섞은 후, 위 전처리 함수를 3개 데이터셋에 적용
배치 크기 지정 및 prefetch 적용
batch_size = 32
train_set = train_set_raw.shuffle(1000).repeat()
# prefetch : 현재 요소가 처리되는 동안 이후 요소를 준비
train_set = train_set.map(preprocess).batch(batch_size).prefetch(1)
valid_set = valid_set_raw.map(preprocess).batch(batch_size).prefetch(1)
test_set = test_set_raw.map(preprocess).batch(batch_size).prefetch(1)
이미지넷에서 사전훈련된 Xception 모델 로드
include_top=False 지정시, 네트워크 최상층에 해당하는 전역 평균 풀링 층과 밀집 출력 층 제외됨
- 이 기반 모델의 출력을 바탕으로 새로운 전역 평균 풀링 층을 추가하고
- 그 뒤에 클래스마다 하나의 유닛과 소프트맥스 활성화 함수를 가진 밀집 출력 층을 놓음
마지막으로 케라스의 Model 클래스 객체 생성
base_model = keras.applications.xception.Xception(weights="imagenet",
                                                  include_top=False)
avg = keras.layers.GlobalAveragePooling2D()(base_model.output)
output = keras.layers.Dense(n_classes, activation="softmax")(avg)
model = keras.models.Model(inputs=base_model.input, outputs=output)
훈련 초기에는 사전훈련된 층의 가중치 동결
for layer in base_model.layers:
    layer.trainable = False
모델 컴파일 및 훈련
optimizer = keras.optimizers.SGD(lr=0.2, momentum=0.9, decay=0.01)
model.compile(loss="sparse_categorical_crossentropy", optimizer=optimizer,
              metrics=["accuracy"])
history = model.fit(train_set, epochs=5, validation_data=valid_set)
Epoch 1/5 86/86 [==============================] - 46s 532ms/step - loss: 0.6858 - accuracy: 0.7758 - val_loss: 1.7375 - val_accuracy: 0.7335
Epoch 2/5 86/86 [==============================] - 39s 450ms/step - loss: 0.3833 - accuracy: 0.8765 - val_loss: 1.2491 - val_accuracy: 0.7592
⋮
Epoch 5/5 86/86 [==============================] - 39s 452ms/step - loss: 0.2430 - accuracy: 0.9121 - val_loss: 1.5182 - val_accuracy: 0.7426
동결 해제 후 훈련
모델을 몇 번의 epoch동안 훈련하면 검증 정확도가 75~80%에 도달하고 더 나아가지 않음
새로 추가한 최상위 층이 훈련이 잘 되었으니, 모든 층의 동결을 해제하고 훈련 지속
- 사전훈련된 가중치가 훼손되는 것을 피하기 위해, 작은 학습률 사용
for layer in base_model.layers:
    layer.trainable = True

optimizer = keras.optimizers.SGD(learning_rate=0.01, momentum=0.9,decay=0.001)
model.compile(loss="sparse_categorical_crossentropy", optimizer=optimizer,
              metrics=["accuracy"])
history = model.fit(train_set, epochs=5, validation_data=valid_set)
Epoch 1/40
86/86 [==============================] - 172s 2s/step - loss: 0.2257 - accuracy: 0.9288 - val_loss: 0.6762 - val_accuracy: 0.8346
Epoch 2/40
86/86 [==============================] - 128s 1s/step - loss: 0.1124 - accuracy: 0.9640 - val_loss: 0.3932 - val_accuracy: 0.9154
⋮
Epoch 40/40
86/86 [==============================] - 127s 1s/step - loss: 0.0021 - accuracy: 0.9996 - val_loss: 0.2386 - val_accuracy: 0.9540